· Clinical reference · 2026 edition
Preparation guidelines
Margin design, reduction, and try-in protocol for every restoration type we manufacture. Skim before the prep visit, share with new associates, and tap any section to see a video demonstration (when published by the lab).
Crown
01
Anterior Crown
Single-unit aesthetics · incisal-edge layering
Prep specifications
- margin
- 1.0 mm shoulder, light-chamfer acceptable supragingival
- facial
- 1.2–1.5 mm reduction (facial)
- incisal
- 2.0 mm incisal reduction (functional clearance)
- lingual
- 1.0 mm lingual (concavity preserved)
- taper
- 6–10° total convergence
- finish
- Smooth, rounded internal line angles · no sharp transitions
Turnaround: 10-14 working hours · same-day option available for Doha clinics
Do
- Keep margins supragingival or equigingival where aesthetic line allows.
- Maintain consistent axial reduction depth — depth-cutter burs help.
- Photograph the prep + adjacent shade tab on the day of impression.
Don't
- Avoid feather-edge margins on anterior crowns — they fracture at the cervix.
- Don't over-reduce the lingual concavity; preserves resistance form.
- No sharp internal line angles — they create stress concentrations.
Crown
02
Posterior Crown
Functional reduction for molars and pre-molars
Prep specifications
- margin
- 1.0 mm chamfer or rounded shoulder
- occlusal
- 1.5–2.0 mm reduction (clearance for opposing cusps)
- axial
- 1.0–1.2 mm reduction
- functional cusp
- Additional 0.5 mm bevel on functional cusp
- taper
- 6–10° total convergence · taller wall = lower taper
- finish
- Definite margin with chamfer bur · no J-margins
Turnaround: 6-9 working hours
Do
- Verify occlusal clearance with the patient in centric AND lateral excursions.
- Add a functional-cusp bevel — prevents perforation through the crown.
- Capture the entire margin in one impression sweep — no double-tear retakes.
Don't
- Don't leave an undercut on the buccal of upper molars — alters the path of insertion.
- Avoid sub-gingival margins deeper than 1 mm — periodontium reacts.
- Don't skip the band-on-band impression check for distal margins.
Indirect
03
Onlay
Cusp-covering conservative restoration

Prep specifications
- cavosurface
- 90° butt-joint at the cavosurface — NO bevel
- isthmus
- ≥2 mm width at the isthmus
- depth
- 2.0–3.0 mm pulpal floor depth
- cusp coverage
- ≥1.5 mm reduction over the covered cusp
- walls
- Diverging cavity walls · 6–10° outward
- finish
- Smooth, polished cavity surfaces — no undercuts
Turnaround: 6-8 working hours
Do
- Cover any cusp with an undermined enamel rod > 2 mm wide.
- Round all internal line angles — onlays love stress relief.
- Use a wedge + matrix during impression to capture the proximal box.
Don't
- Don't bevel the cavosurface — onlay relies on a butt joint for marginal strength.
- Avoid leaving sharp axiopulpal angles — they fracture in firing.
- No subgingival proximal margins below 2 mm — moisture control fails.
Indirect
04
Inlay
Intra-coronal · no cusp coverage

Prep specifications
- cavosurface
- 90° butt-joint — bevel is contraindicated
- isthmus
- ≥1.5 mm width
- depth
- 1.5–2.5 mm pulpal floor depth
- taper
- 6–8° diverging walls (towards the occlusal)
- box form
- Proximal box with definite gingival floor
- finish
- Smooth walls, no undercuts, axiopulpal line angle rounded
Turnaround: 6-8 working hours
Do
- Keep the cavity confined to the affected area — preserve enamel rim.
- Verify minimum 1.5 mm isthmus or upgrade to an onlay.
- Use rubber dam for the impression — moisture warps the proximal box.
Don't
- Don't bevel the cavosurface margin.
- Avoid undercuts — they prevent seating of the milled inlay.
- No occlusal contact directly on the cavosurface — recipe for marginal chipping.
Multi-unit
05
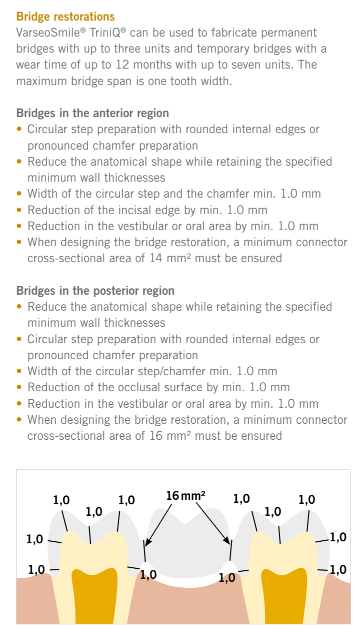
Bridge
Abutment prep + pontic design considerations
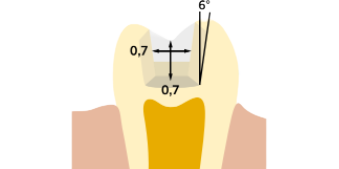
Prep specifications
- abutment margin
- 1.0 mm chamfer or shoulder (matched on both abutments)
- abutment reduction
- Standard crown reduction (1.0–1.5 mm axial · 2.0 mm occlusal)
- pontic
- Modified ridge-lap for posterior · ovate for anterior aesthetics
- connector
- Minimum 9 mm² cross-section (zirconia · 3-unit)
- taper
- 6–10° matched between abutments — common path of insertion
- finish
- Both abutments must be reduced symmetrically — uneven prep = uneven cementation
Turnaround: 12-16 working hours
Do
- Achieve common path of insertion BEFORE impression — verify with surveyor.
- Round-off undercuts on both abutments at the same time.
- Photograph the pontic site after preparation so the lab can design ovate emergence.
Don't
- Don't accept >15° divergence between abutments — bridge won't seat.
- Avoid placing the connector below the gingival margin.
- No span longer than 3 units in zirconia without confirming with the lab first.
Aesthetic
06
Veneer
0.3–0.5 mm laminate · enamel-preserving

Prep specifications
- facial
- 0.3–0.5 mm reduction · depth-cutter recommended
- incisal
- 1.0–1.5 mm overlap (palatal chamfer)
- margin
- Feather-edge OR 0.3 mm chamfer · supragingival
- interproximal
- Just break contact · stay within enamel
- taper
- Minimal — preserve as much enamel as possible
- finish
- Smooth · highly polished · enamel rod-ends sealed
Turnaround: 10-14 working hours
Do
- Use depth-cutter burs on the facial — protects against over-reduction.
- Keep the palatal margin above the centric contact whenever possible.
- Photograph the prep with retraction cord placed — captures the margin.
Don't
- Don't go through the enamel into dentine — bond strength collapses.
- Avoid placing the margin in a heavy occlusal contact area.
- No supragingival 'L-shaped' incisal preparation — fractures during cementation.
· Need a remake or a same-day case?
Send us your prep — we'll handle the rest.
Same-day crowns for Doha clinics, 24-48h dispatch across the GCC. Free pickup over QAR 800.